Turn Kitchen Scraps into Garden Gold with This Easy Worm Tower!
Have you ever wondered how to make the most of your kitchen waste and help your garden thrive at the same time? The secret is simpler than you think. With just a PVC pipe, a handful of worms, and a little elbow grease, you can transform food scraps into rich, fertile soil that will supercharge your garden.
Welcome to the world of the worm tower, an easy and effective composting system that allows your plants to benefit from the magic of worms. In this article, I’ll walk you through the process of creating your very own worm tower in just a few steps.
What Is a Worm Tower, and Why Should You Have One?


 (@sunnysideurbangarden)
A worm tower is an in-ground composting system that allows worms to break down food waste right in your garden bed. Unlike traditional composting, which requires turning piles and managing heat, the worm tower works passively.
Worms break down organic matter and enrich the soil with their nutrient-rich castings (worm poop!), which plants can directly access. If you’re looking for an efficient, low-maintenance way to recycle your kitchen scraps, this is a fantastic solution!
Why Worm Towers Are Perfect for Gardeners
Worm towers provide a continuous supply of natural fertilizer to your plants without the need for expensive commercial products. They’re perfect for gardeners who want:
- Sustainable composting: Turn kitchen scraps into usable compost right where your plants need it.
- Healthier plants: Worm castings contain essential nutrients that improve plant growth and increase resistance to disease.
- Low-maintenance composting: No turning, no piles, no mess—just drop in food scraps and let the worms do their work!
The Materials You’ll Need to Build a Worm Tower
Before we dive into the process, let’s gather the simple materials:
- PVC pipe: 4–6 inches in diameter and 2–3 feet long.
- PVC cap: To cover the top of the tower.
- Drill: With a ¼–½ inch bit for air and drainage holes.
- Shovel: To dig the hole for your tower.
- Composting worms: Red wigglers are best for the job.
- Kitchen scraps: Fruit and vegetable peels, coffee grounds, and more.
Step 1: Cut and Prepare Your PVC Pipe
The first step to building your worm tower is preparing the PVC pipe. Cut it to about 2–3 feet in length. The bottom 12–18 inches of the pipe will be buried underground, so make sure the remaining portion sticks out for easy access.
Once cut, use a drill to make several holes around the bottom half of the pipe. These holes will allow the worms to move in and out of the soil while ensuring adequate air circulation.
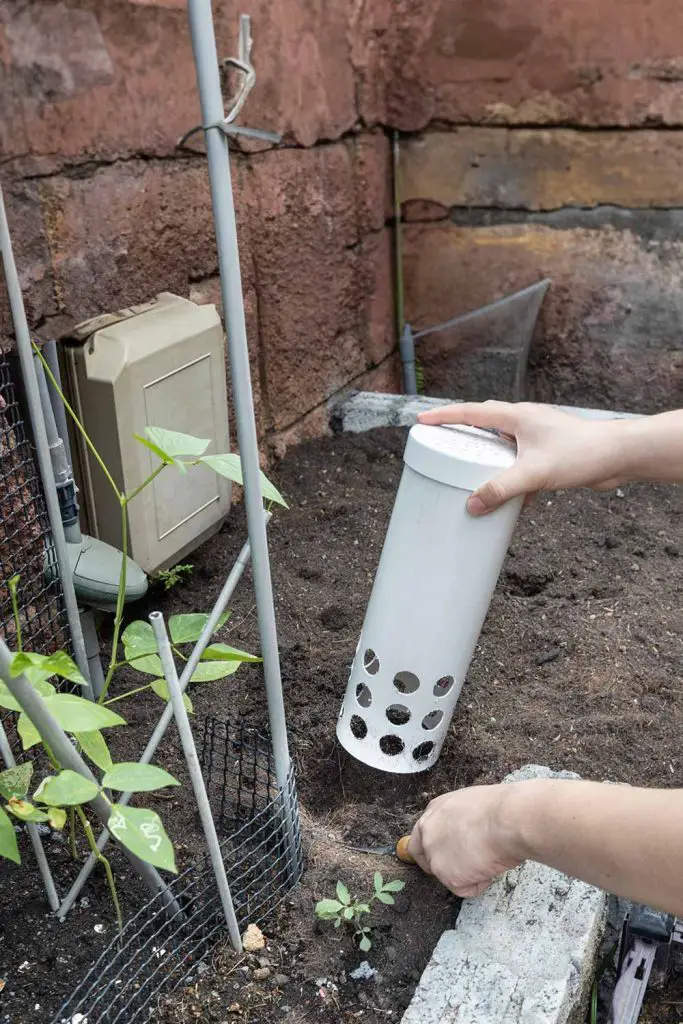
Step 2: Find the Perfect Spot in Your Garden
Choosing the right location for your worm tower is important. Ideally, place it near plants that can benefit from the nutrient-rich compost.
Dig a hole that’s deep enough to bury the bottom half of the PVC pipe, leaving about 6–12 inches above ground. The pipe should sit securely in the hole, so take care to backfill the soil and press it firmly around the base.
Step 3: Add Some Bedding and Worms
Once the pipe is in place, it’s time to introduce your new garden helpers. Start by adding a layer of soil or compost at the bottom of the pipe.
This will serve as a base for the worms. Then, add your red wigglers. These little guys will do all the hard work for you, breaking down the food scraps and turning them into valuable compost for your garden.
Step 4: Begin Feeding Your Worms with Kitchen Scraps
Now for the fun part—feeding the worms! Start adding small amounts of kitchen scraps like vegetable peels, fruit scraps, coffee grounds, and eggshells. Avoid meat, dairy, and oily foods, as these can attract pests and slow down the composting process.
As you continue to feed them, the worms will digest the scraps and convert them into nutrient-rich worm castings.
How to Maintain and Monitor Your Worm Tower
Maintaining your worm tower is incredibly simple. Add food scraps regularly, and keep an eye on the moisture level inside the pipe. Worms thrive in moist environments, so if you notice things getting dry, sprinkle in a little water. Every few weeks, check on your worms to ensure they’re thriving. If the tower starts to fill up with compost, remove some to use around your plants.
Benefits of Worm Castings for Your Plants
Worm castings, also known as “black gold,” are one of the best fertilizers you can give to your garden. They contain essential nutrients like nitrogen, phosphorus, and potassium, which plants need for strong growth. Plus, castings improve soil structure, enhance water retention, and encourage beneficial microbes, leading to healthier, more resilient plants.
Troubleshooting Common Worm Tower Problems
Although worm towers are low maintenance, a few issues can arise:
- Too dry: Add a little water if the tower dries out.
- Smell: If the tower smells bad, reduce the amount of food you’re adding or mix in some brown material (like shredded newspaper).
- Pests: Cover the top with a PVC cap or breathable mesh to keep flies and other pests away.
How Worm Towers Help the Environment
One of the biggest advantages of using a worm tower is its environmental impact. By recycling kitchen waste directly into your garden, you’re reducing the amount of food waste that ends up in landfills. In turn, this decreases methane emissions from landfills, a potent greenhouse gas. Plus, you’re creating a closed-loop system that benefits your garden and the planet.
Start Small and Expand Your Worm Tower System
If you find that your worm tower is working wonders, why stop at one? You can easily expand your system by adding more towers in different sections of your garden. Multiple worm towers will create a network of nutrient-rich compost zones, ensuring that every plant in your garden reaps the benefits. And because they’re so easy to build and maintain, you can have a fully composting garden in no time.
Watch Your Garden Flourish with a Worm Tower!
A worm tower is a simple, cost-effective way to turn your kitchen scraps into “garden gold” while improving the health of your plants and the environment. With just a few basic materials, you can build a system that works quietly underground, providing constant nourishment to your garden without the hassle of traditional composting.
Give it a try, and before long, your garden will thank you with healthier plants, vibrant growth, and bountiful harvests!

More interesting articles you may be interested in reading:


